


Table of Contents
- Amia’s Choice: The Ultimate Tutuila Handheld UV Lamp Revolution
- Technical Blueprint: Comprehensive Features of the Flash Curing Light
- Step-by-Step Application Guide: Mastering Your Creative Gel Process
- Critical Curing Parameters & Layering Dynamics
- International Shipping Timelines & Customer Frameworks
Amia’s Choice: The Tutuila Handheld UV Lamp Revolution
Welcome to Artmiss, your premium online nail mart where professional technology meets effortless artistic curation. For years, nail technicians have encountered frustrating issues with traditional desktop dryers when trying to secure complex extensions or delicate charms. Because standard lights can let materials slip out of place, sourcing an agile, handheld flash curing light became my personal mission. Consequently, we are thrilled to bring this beautiful, high-efficiency device directly to our global nail mart community.
Technical Blueprint: Comprehensive Features of the Flash Curing Light
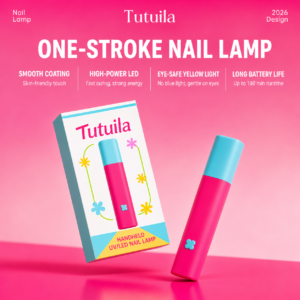
Understanding the core mechanics of your equipment is vital for avoiding structural mistakes and maintaining pristine nail health. The Tutuila handheld UV lamp represents a massive leap forward in portable curing design by utilizing an optimized eye-protection light spectrum. By filtering out hazardous short-wave blue light radiation, it protects your eyes while supplying immense curing performance to every finger.
Technical Parameter Breakdown
To give you a precise understanding of its operational capabilities, we have outlined the official technical parameters below. These exact specifications ensure that your specialized gel mediums cure perfectly without experiencing shrinkage.
| Hardware Element | Official Parameter | Practical Advantage |
|---|---|---|
| Optical Hardware | Single High-Power LED Bulb with Condensing Lens | Provides 2x the luminous efficiency of standard multi-bulb lights. |
| Spectrum Output | Eye-Safe Yellow Light (Removes short-wave blue) | Prevents macular strain and stops skin from tanning or aging. |
| Chassis Finish | Excimer Nano-Coating Technology | Delivers a delicate, velvety, fingerprint-resistant tactile grip. |
| Battery Performance | Ultra-Long Lithium Cell / 180 Minutes Runtime | Supports multiple long-form salon appointments without a wire. |
| Charging Standard | Type-C Port (Requires standard 5V Charger) | Ensures stable power absorption; protects the internal micro-circuits. |
Design Engineering & Practical Utility
- All-Round Wrapping Chamber: The specialized lens cone casts a concentrated beam that encapsulates the entire nail tip, providing full wrapping rays that prevent sticky, under-cured gel boundaries.
- Smart Quad-LED Indicator Display: Four bright micro-lights instantly communicate both your active 20-second curing countdown and live power increments, flashing once per second for flawless time tracking.
- Multifunctional Clover Power Key: Single-clicking the tactile flower button controls the basic power toggle, while a steady long-press brings up your live battery readings in clean 25% steps.
- Custom-Fit Flower Stand Attachment: Each set includes a matching 3D-printed stabilizer base, allowing you to position the light horizontally over your finger for hands-free flash curing.
- Universal Type-C Fast Integration: Enjoy effortless charging via laptops or standard power bricks, but please avoid high-voltage fast chargers to prevent damage to the delicate internal system.
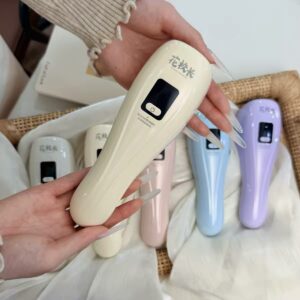
- Velvety Anti-Slip Contour: The sleek, modern stick shape naturally matches the contours of your hand, preventing accidental slips when securing complicated overlays.
Step-by-Step Application Guide: Mastering Your Creative Gel Process
To achieve maximum structural stability with your portable handheld UV lamp, implementing a structured workflow is highly recommended. Applying your varied gel materials in methodical, controlled stages ensures that each layer cross-links successfully with the next. Please study our official application breakdown below to elevate your overall salon craftsmanship.
Before starting your application, it is incredibly beneficial to consult our comprehensive step-by-step roadmap found in the official complete nail art process guide. Gaining a deep understanding of standard chemical prep work and filing methods will prevent premature lifting near the cuticles. Once your natural nail plates are perfectly dehydrated, you can comfortably begin building your gel structure.
Phase 1: Precision Foundation and Apex Alignment
First, apply an ultra-precise, uniform layer of an advanced adhesive base directly onto the natural nail surface. We strongly suggest using our premium Jjiang Mochi Base Gel to create a highly flexible, rubberized layer that easily absorbs daily shocks. Alternatively, if your client possesses thin or brittle nail structures, applying the self-leveling Naillove Building Base Gel will quickly build a gorgeous apex.
Next, hover the high-power condensing lens of your handheld UV lamp roughly two inches away from the wet nail matrix. Click the flower button to activate the 20-second intelligent curing countdown, allowing the focused yellow beam to freeze the base gel perfectly. This rapid stabilization locks the fluid material in place, stopping it from flooding into the lateral sidewalls before you use a full-sized desk light.
Phase 2: Color Saturation and Detailed Embellishments
After your structural foundation has been safely anchored, you can introduce your color coats or detailed artistic elements. For creating gorgeous embossed textures or 3D character art, applying our popular, non-running Pudding Gel is highly recommended. Because these specialty formulas carry heavy color loads, securing full optical penetration is essential to avoid under-curing.
Slowly guide the targeted light beam of your handheld UV lamp directly over the intricate art pieces to cross-link the material uniformly. Thanks to the integrated high-transmission lens, the light energy penetrates deeply into dense art mediums. Consequently, the risks of internal gel wrinkling or hidden wet pockets are eliminated completely, keeping your artwork immaculate.
Phase 3: Mirror-Finish Sealing and Final Curing
Finally, apply a generous protective shield across the entire finished design to lock in intense gloss and protect against scratches. Sweeping on a beautiful layer of our high-shine MODING C9 Water Light Top Coat will instantly create a breathtaking glass finish. Make sure to completely cap the free edge of the nail to block moisture and prevent chipping.
Conclude the appointment by running your final, extensive curing cycle to guarantee that all polymers reach full structural hardness. Keep the yellow beam steadily aimed across the entire nail plate until the top coat is thoroughly sealed. Your final result will be an incredibly resilient, high-gloss manicure that stays flawless for weeks.
Critical Curing Parameters & Layering Dynamics
Navigating the unique chemical behaviors of modern professional gel formulas is essential for preventing salon lifting or service failure. Different top seals and structural builders require specific amounts of light exposure to reach full polymerization. Therefore, adapting your curing times based on specific chemical types is vital for creating long-lasting nail extensions.
No-Wipe Versus Traditional Wipe Material Mechanics
When you are using a slick, no-wipe top coat, providing a longer curing duration is highly recommended. These specialized formulas need a sustained dose of concentrated rays to fully bake their dense, stain-resistant outer surfaces. We firmly advise maintaining exposure under the handheld UV lamp for approximately 90 seconds to ensure a bone-dry finish and prevent cloudy patches.
Conversely, traditional sticky-style base formulas and pigmented color coats require much less light exposure to stabilize. Standard base layers and structural overlays generally need a quick 30-second cycle under the light beam to freeze. Do not attempt to clean away the sticky dispersion layer left behind during these steps, as this tacky texture is required to bond the next layer.
Double-Wrapping Protocols for Intricate Multi-Layer Art
If you want to paint new designs or apply chrome pigments right over a no-wipe layer, executing a protective wrapping step is essential. Applying a fresh layer of gel directly onto a glassy, fully cured no-wipe surface often causes immediate peeling due to a total lack of texture. To fix this problem, simply apply a thin layer of traditional sticky base gel over the slick surface first.
This simple intermediary step provides a necessary sticky matrix that locks the separate sections together seamlessly. By utilizing this strategic double-wrapping technique, you eliminate the threat of layer separation entirely. Your elaborate multi-layered manicures will maintain their structural integrity without experiencing any lifting or edge delamination.
International Shipping Timelines & Customer Frameworks
At Artmiss, we are committed to delivering professional-grade nail tools directly to your business or home with complete transparency. Because our premium product catalog travels via specialized international air express networks, specific shipping timeframes apply to all global destinations. Understanding these transit times helps you manage your studio inventory perfectly.
Our international shipping data shows that the average delivery time takes between 7 to 12 business days after fulfillment. This window covers thorough customs inspections, international flight schedules, and final local distribution sorting. Please note that each Tutuila handheld UV lamp is safely padded in custom packaging to prevent any damage during transit.
To ensure your shopping journey remains fully protected, comprehensive regulatory documentation is permanently available on our platform. Our official purchase policy, detailed refund criteria, and strict data privacy guidelines are neatly organized at the very bottom of our webpage. Please navigate to our website footer at your convenience to review these structural agreements prior to finalizing your acquisition.
Please Note: Because our custom stabilizer bases are crafted using professional 3D-printing equipment, minor filament lines or microscopic gaps may occasionally be visible on the plastic shell. This is a normal cosmetic feature of the manufacturing process and does not affect the operation of your light. We kindly note that we do not accept returns based on these minor 3D-printed cosmetic details.
Join Our Global Nail Art Community
Want to unlock real-time step-by-step masterclasses, product unboxings, and exclusive community discounts? Follow our official social media channels to stay inspired and level up your nail techniques:
Reviews
There are no reviews yet.