


Table of Contents
- Amia’s Choice: Unlocking the RONGYUEBEAR 50-Color Nail Blooming Ink System
- Comprehensive Kit Specifications & Premium Highlights
- Step-by-Step Salon Guide: Creating Flawless Watercolor Nail Art
- Crucial Chemical Guidelines: Managing Curing Schedules and Layering Success
- Global Delivery Protocols & Client Protection Policies
Amia’s Choice: Unlocking the RONGYUEBEAR 50-Color Nail Blooming Ink System
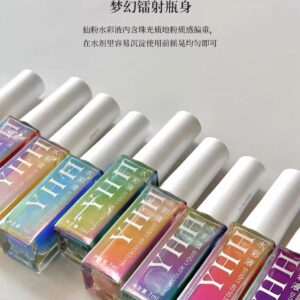
As Artmiss founder, I highly recommend our premium RONGYUEBEAR 50-color nail blooming ink collection. These ultra-vibrant, effortless formulas create mesmerizing watercolor and marble gradients seamlessly. Welcome to our online nail mart, where professional-grade innovation meets infinite artistic curation.
Sourcing exquisite, highly functional supplies is the core mission at our specialized nail mart platform. For a long time, traditional nail blooming ink kits lacked structural organization, causing colors to look muddy or inconsistent. By introducing this massive, fifty-shade professional spectrum, we are empowering salon artists and independent creators to design high-end, custom visual landscapes with absolute ease.
When you choose to enhance your studio setup through our premium nail mart channel, you get a fully synchronized system. Every single bottle delivers instant, highly fluid diffusion that allows you to mimic natural marble veining, smoky quartz, or delicate organic petals effortlessly. Let us look deeper into the premium product highlights and physical features that make this kit a staple on your station.
Comprehensive Kit Specifications & Premium Highlights
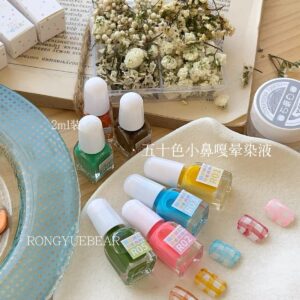
Achieving breathtaking watercolor nail art requires deep, rich pigment saturation along with highly stable material chemistry. The RONGYUEBEAR professional collection is engineered specifically to give you effortless blending control across fifty distinct variations. Furthermore, the entire bundle is structurally organized to keep your workspace looking immaculate and sophisticated.
Premium Hardware Component Breakdown
To ensure maximum efficiency during busy salon hours, this collection includes professional display and storage tools. The matrix below outlines the exact physical components included with each complete set.
| Included Hardware | Material & Design | Practical Benefit |
|---|---|---|
| Premium Storage Box | Heavy-Duty Clear Acrylic (RONGYUEBEAR Branding) | Keeps all 50 bottles perfectly upright and organized at a glance. |
| Master Color Display Chart | Polished Acrylic Palette with Grid Positions R01-R50 | Allows clients to preview exact watercolor transparency levels quickly. |
| Fluid Formula Matrix | High-Volatility Alcohol-Based Blooming Compound | Dries instantly in open air without needing a UV lamp step. |
Key Product Features
- Infinite Color Variety: Featuring fifty distinct pigment codes from R01 to R50, this kit provides complete spectrum coverage including subtle soft pastels and deep, rich jewel tones.
- Organic Dried Flower Compatibility: This collection pairs beautifully with natural dried flowers to effortlessly create intricate floral patterns and stunning multi-dimensional textures.
- Zero-UV Volatility: The liquid compound vaporizes and spreads naturally upon contact with the gel surface, meaning you do not need to flash-cure the ink layers while styling.
- Full-Coverage Gel Wrapping: Our system works seamlessly with surrounding gel layers to ensure complete edge encapsulation, which completely prevents under-curing or wet pockets at the margins.
Step-by-Step Salon Guide: Creating Flawless Watercolor Nail Art
To ensure maximum wear time and prevent chips, you should apply your blooming layers using a structured gel workflow. Spreading fluid pigments over wet or un-prepped surfaces can easily cause the design to bleed or lift prematurely. Please follow our official step-by-step masterclass method below to achieve perfect results every time.
Before introducing any color mediums, it is highly beneficial to review the fundamental prep steps in our complete nail art process guide. Properly cleaning the cuticles and treating the natural nail surface ensures that your subsequent layers adhere beautifully. Once your mechanical prep work is complete, you can begin building the structural foundation.
Phase 1: Base Application and Apex Construction
First, apply an even coat of a flexible, rubberized adhesive base across the clean nail surface. We strongly suggest using our popular Jjiang Mochi Base Gel to create a shock-absorbing foundation that stops lifting. Alternatively, for clients with thin or brittle nails, you can apply our self-leveling Naillove Building Base Gel to quickly sculpt a gorgeous, smooth apex.
Next, cure your base layer completely under a standard salon UV lamp. To create the ideal canvas for marbleizing, apply one or two coats of a solid opaque white or soft milky white gel. Cure each color layer thoroughly to provide a clean background that makes your watercolor gradients pop beautifully.
Phase 2: Fluid Manipulation and Artistic Blending
To get total control over how your ink spreads, apply a thin coat of matte top gel or wipe away the sticky layer with alcohol before starting your art. Lightly dot your chosen RONGYUEBEAR shades onto the surface using the built-in precision brush. Consequently, the liquid will begin spreading outward on its own, creating organic marble veins.
Additionally, you can dip a separate clean art brush into 95% rubbing alcohol or a specialized blending fluid to soften harsh lines. Gently tap the wet edges to create soft ombre gradients or deep watercolor depths. For extra dimension, you can gently place delicate dried flower pieces into the damp ink to form gorgeous floral designs.
Phase 3: 3D Texturing and High-Shine Sealing
Once your beautiful air-dried ink patterns are fully set, you can easily add gorgeous, raised accents to your design. We highly recommend using our thick, non-running Pudding Gel to create elegant 3D borders or clear rain-drop effects over your watercolor art. This combination creates a beautiful contrast between the soft watercolor base and the sharp, glossy 3D structures.
Finally, apply a generous protective shield over the entire nail to lock in intense gloss and protect against scratches. Sweeping on a beautiful layer of our high-shine MODING C9 Water Light Top Coat will instantly create a breathtaking glass finish. Make sure to completely cap the free edge of the nail to block moisture and prevent chipping.
Crucial Chemical Guidelines: Managing Curing Schedules and Layering Success
Understanding the unique chemical behaviors of modern professional gel formulas is essential for preventing salon lifting or service failure. Different top seals and structural builders require specific amounts of light exposure to reach full polymerization. Therefore, adapting your curing times based on specific chemical types is vital for creating long-lasting nail extensions.
No-Wipe Versus Traditional Wipe Material Mechanics
When you are using a slick, no-wipe top coat, providing a longer curing duration is highly recommended. These specialized formulas need a sustained dose of concentrated rays to fully bake their dense, stain-resistant outer surfaces. We firmly advise maintaining exposure under the lamp for approximately 90 seconds to ensure a bone-dry finish and prevent cloudy patches.
Conversely, traditional sticky-style base formulas and pigmented color coats require much less light exposure to stabilize. Standard base layers and structural overlays generally need a quick 30-second cycle under the light beam to freeze. Do not attempt to clean away the sticky dispersion layer left behind during these steps, as this tacky texture is required to bond the next layer.
Double-Wrapping Protocols for Intricate Multi-Layer Art
If you want to paint new designs or apply chrome pigments right over a no-wipe layer, executing a protective wrapping step is essential. Applying a fresh layer of gel directly onto a glassy, fully cured no-wipe surface often causes immediate peeling due to a total lack of texture. To fix this problem, simply apply a thin layer of traditional sticky base gel over the slick surface first.
This simple intermediary step provides a necessary sticky matrix that locks the separate sections together seamlessly. By utilizing this strategic double-wrapping technique, you eliminate the threat of layer separation entirely. Your elaborate multi-layered manicures will maintain their structural integrity without experiencing any lifting or edge delamination.
Global Delivery Protocols & Client Protection Policies
At Artmiss, we are committed to delivering professional-grade nail tools directly to your business or home with complete transparency. Because our premium product catalog travels via specialized international air express networks, specific shipping timeframes apply to all global destinations. Understanding these transit times helps you manage your studio inventory perfectly.
Our international shipping data shows that the average delivery time takes between 7 to 12 business days after fulfillment. This window covers thorough customs inspections, international flight schedules, and final local distribution sorting. Please note that each blooming ink set is safely padded in custom packaging to prevent any leakage during transit.
To ensure your shopping journey remains fully protected, comprehensive regulatory documentation is permanently available on our platform. Our official purchase policy, detailed refund criteria, and strict data privacy guidelines are neatly organized at the very bottom of our webpage. Please navigate to our website footer at your convenience to review these structural agreements prior to finalizing your acquisition.
Join Our Global Nail Art Community
Want to watch real-time step-by-step masterclasses, discover new product releases, and receive exclusive community discounts? Follow our official social media channels to stay inspired and level up your salon techniques:
Reviews
There are no reviews yet.